Welcome to my little patch and thanks for stopping by! I hope you can be inspired in some way by my creations. If blogger is playing nicely please leave me a comment so I know you were here! :) Star xx

Sunday, February 16, 2014

Mad About Scrappin - February Sketch Challenge

This month I decided to play along with the sketch challenge over at Mad About Scrappin.

Here's the sketch:


And here's my take on it:


I knew as soon as I saw the sketch that I wanted to use a photo strip for the 4 pictures. It was not an easy photo to match papers with so I decided to go predominantly with green and a few accents of teal and light blue. The whole green background was a bit much so I started by swiping some gesso on to tone it down a little. 


Next I used a template and some distress ink to make the hearts. I felt they needed to blend in a little more so I went around the edges with some twinkling h2o's and a waterbrush. I added some splatters too and then some random stamping with a background stamp.


I used a dyed paper doiley in place of the circle on the sketch. I also decided to use a few layers of patterned paper under my photos. 


I added a few extra layered embellies and finished off with a cluster of flowers.

Products used:
Bazzil cardstock - Walnut Cream, Sweet Shoppe papers, element stickers and alphabet by Simple Stories, Dyed paper doiley, D-lish Scraps embellishments; Old Fashioned Rose, Hydrengea Petals, Vintage Rose, Flair, Resin Roses from grab bag, self adhesive pearls, wire, Viola, resin butterflies, pastel cup sequins, Journal It's - Days of the Week.

Monday, July 1, 2013

Breaking the drought ...

To say things have been a little hectic lately would be an understatement! Ever have those times when you just want the ride to stop so you can step off and take a breath?! With everything else having to take a front seat lately scrapping just really hasn't been an option. I did make a few attempts, but it's really hard to just push aside all those other more pressing jobs and create. Mr Mojo certainly didn't want to play the game. 

Finally on the weekend, with most of the important things out the way I was able to just sit and create and it felt so good :) I got two layouts done. 

The first is titled 'Little Lollipop Thief' and documents the time Ellah helped herself to a treat at the checkouts. 


I used some yummy Teresa Collins papers that I bought from Mad About Scrappin mixed with chipboard from Memory Maze and embellishments from D-lish Scraps.


I recently invested in a set of metallic Sharpies at a recent show, had no idea what I was going to use them for but just 'had-to-have' them. Now I wonder where they have been all my life! They colour on the chipboard so effortlessly and there is absolutely no drying time. For a moment I was thinking I would have to did out the embossing powder to colour my butterflies gold ;) lol I added it to a pretty cluster of D-lish Scraps flowers; a large resin rose, azalea, vintage rose, cosmos daisy and a lily.


I added a smaller butterfly down the bottom edge where my journaling is.


Then to balance it all, a smaller cluster of embellishments where the frame and photos meet. The pink flower is an altered vintage rose. I simply flattened out the outer petals, snipped out the centre and added a pearl cabochon to the centre. You can see the before and after transformation in the pic below.


The second layout I created is one of my favourite photos. It beautifully captures the special bond between Cody and his piggie Oatie.


I used Simple Stories papers for this one that I picked up at my local scrap store, Bella Paperie. Lots of yummy Memory Maze chipboard on this one too! I needed a bit more variety in paper but only had two sheets so the chevron paper bag was perfect! I made a jumbo journal card to go inside, which is great for when you have a lot of story to tell. 


Again I went to town with my metallic Sharpie, the silver one this time. I used it on quite a few of the chipboard pieces. Here on the word 'together' which I have layered on some chevron washi tape from D-lish Scraps.


I framed the photo with a pinked circle and added some stars and a little chipboard camera.


I used the 'sweet' from the flag banner words pack and tucked it inside another star. Finished off with a twine bow it makes the perfect boy themed embellishment. 

That's all for today, hopefully it won't be so long between shares next time.
Amanda xx

Sunday, June 2, 2013

Inspired Blueprints Sketch #96

I was so excited when I saw this sketch go up in the DT forum! I have a teeny obsession with my instagram prints at the moment so I knew the hardest part would be choosing which one to use. 

Here's the sketch:


And here's my take on it:


I stayed quite true to the sketch, just adding a few extra layers of patterned paper which I cut into fishtail banners. The paper is Teresa Collins Summer Stories range that I picked up at the last Mad About Scrappin - Flog it Friday sale.


The background was made by inking through two different stencil, Prima - Attic Windows and Crafters Workshop - Paint Splatter. I cut one of the Martha Stewart doilies in half to layer my embellishments on to. I used a Prima flower as well as a small rose and felt blossom from D-lish Scraps.


On the other side I handstiched this bow from some chevron ribbon and also used some of the bold chevron arrow washi tape from D-lish Scraps.


The title was made from a mixture of thickers and word strips made with my MoTEX tape writer. These awesome gadgets are available from D-lish Scraps for just $15, which is 25% off RRP. The starter pack includes; the machine, 2 different font wheels and a roll of tape. You can choose between pink and lime and to really get your collection going, an additional 12 colours of tape are available at just $3 per roll. 

Thanks for stopping by
Star xx

Tuesday, May 28, 2013

Memory Maze Blog Hop Winner!

Did you check the post over at Memory Maze to see if you were the winner of the hop?


The lucky winner from my blog prize is ...

Jackie!

Congrats! Please contact me :)

Thanks to everyone that hopped by xx

Monday, May 20, 2013

Memory Maze blog hop!

Hello, hello!

Welcome to Memory Maze's First ever blog hop!!


If you didn't come from Susan's blog or you popped upon this blog and didn't realise we were blog hopping you need to go to the Memory Maze blog and start the HOP! 

You will need to comment on ALL of the blogs to be eligible for the prize. Plus some of our awesome designers are giving away a prize on their blogs as well. 

 Here's what you could win from Memory Maze.


The winner will be announced at the Memory Maze blog on the 26th May!

Our theme for this blog hop is Technique, each of our wonderful design team members will show you how to decorate those chipboard pieces or create new chipboard pieces.

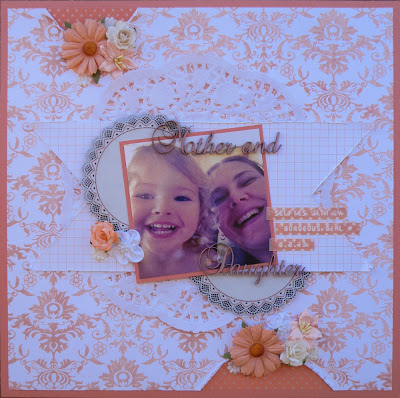
Here is a layout I created for the hop:


I used a doiley and the 'Mother and Daughter' title chipboard pieces from Memory Maze to showcase this cute selfie of me and my gorgeous baby girl.

Now for the details:


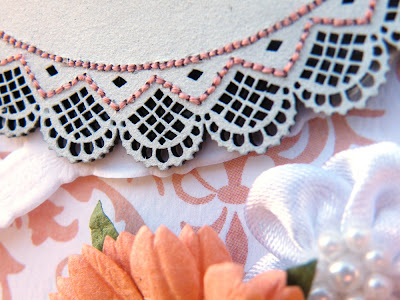
I gave the chipboard doiley a light coat of gesso before cutting it in two. A great tip which helps stretch your chippy further, especially if it won't be seen. I loved the dotted detail around the edge and I couldn't resist the temptation to stitch it. I used a very fine beading needle to go through the holes and even though it did take me a while it was well worth the effort! 


The title I gave a light coat of ink and then cut it from the supportive bar it comes attached to. Having the words separate was great because I could spread them out on my page.


I tore sections out of the background paper and rolled the edges back. I filled these spaces with washi tape before adding my floral clusters to the top.


I also added a smaller cluster to the side of one of the chipboard doiley pieces.


And lastly a close up of my lowest cluster where you can just see the stitching detail again.

I have a prize up for grabs as my way of saying thanks for stopping by. All you need to do to go in the draw is be a follower of this blog and leave me a comment.

I popped together this delicious pack of vintage inspired Memory Maze chipboard and embellishments.


Prize includes postage within Australia and New Zealand only. Other international guests are more than welcome to enter but you may have to cover additional postage costs.

Our blog hop runs from today, Monday 20th May, invite your friends to play along. You must comment on all the blogs for a chance at the major prize. 

The winner will be announced here on the 26th May!

The next stop on the blog hop is Tracey so pop on over and let her know what your favourite piece of Memory Maze chipboard is.

Thank you for playing along with our first Blog Hop, we hope that you had fun and will be back to join in again.

Here's a list of the hop participants just in case you get lost along the way ;)

Amanda Lawrence (you are here)


Saturday, March 9, 2013

Inspired Blueprints #86

Another week means another sketch revealed at Inspired Blueprints. We work on alternating teams for our DT shares and this week it my teams turn. Here's my reveal:


I loved the layout of the sketch but didn't have any photos that big to scrap. Simple solution was to use a series of smaller 2x3's and mat them to fill the space. I had a great set of photos from when Ellah was learning to walk, an event that really needs more than a single shot to tell the story. 


Papers are from October Afternoon and I've used a tonne of D-lish Scraps embellies for my clusters. A single bloom, large resin rose, pins, viola, hydrangea petals, beads and adhesive pearls in this one.


I used a strip of 3 manilla tags for my journaling area all tied with cotton twine bows. In this smaller cluster I have another viola, more hydrangea petals, small rose, resin from various grab bags and some adhesive pearls. All embellishments are available in the store right now. 

Here's the sketch where it all began:


If you're scrapping this weekend, why not give it a kick start with a sketch from Inspired Blueprints!

Thanks for stopping by
Star xx

Thursday, February 28, 2013

February Memory Maze layouts

I'm still so stoked that Sally invited me to join the Memory Maze design team. Opening my DT parcel was like Christmas {well it was for my friend who tore into it for me} so many delicious chipboard pieces inside. I started sorting through the box and matching up the pieces with photos I had, to pre-pack layouts ready for a rainy day of creating.


I have 3, never-seen-before layouts to share with you all today. They are all quite different in style which really shows off the versatility of chipboard in your projects.

Sweet Dreams my Little Angel


I've been carrying this photo of my daughter around for a while now along with all the supplies to create it. I had an idea of how I wanted it to look, but have been too scared to actually attempt it. I can honestly say that although it didn't turn out exactly how I envisioned {when does it ever} I am so happy with the result.


The background was created by inking through two different stencils in various areas. I then added texture by tearing and scrunching tissue paper and mod podging it over the top. You can see some of it under my main embellishment cluster.


For my smaller embellishment cluster I used a Border Hook 1 with a paper doiley folded over it to look like a hanging pennant. 


To create my title I used a Dreams mini word which I placed inside a Scalloped Name Plate. The name plate was simply inked and the word painted with a thin coat of white gesso.

Memory Maze products:
Border Hook 1 - S0147
Scalloped Name Plate - X0001
Dreams - G0011

Other products:
Glitz Design papers, Prima resin angel wings, Green Tara beaded spray, D-lish Scraps flowers, resin and paper doilies, embroidery thread, inks, tissue paper.

..................................................

Beach Shadows


This is a photo of my son and I at the beach over New Year. I had a grand plan to draw the heart in the sand and get the whole family in, not my best idea with a toddler who can't stand still!


The background for this layout was created by inking through a Crafters Workshop template. 


For my top cluster I used Wrought Iron 49 and added some of my embellishments to it. I wanted the chipboard to offset the dark shadows in the photo so I simply inked them black. 


The lower cluster uses Wrought Iron 25. I inlaid the back of it with patterned paper to make it stand out more. 

Memory Maze products:
Wrought Iron 49 - S0449
Wrought Iron 25 - S0446

Other products: 
Crate Paper patterned papers, D-lish Scraps doilies, flowers, resin and washi tape, ink.

..................................................

Owl will always Love You


Some cute little selfies of me and my boy so I just wanted to create a fun and playful page.


I used the Love mini word as part of my title. I have coloured with some Twinkling H2O's to match.


I used a few different types of media to decorate my Owl on a Branch. Firstly I masked off the owl and leaves with some washi tape. I use this as it is low tack and less likely to tear the surface when you remove it. The woodgrain on the branch was stamped using a Kaiser background stamp. The leaves were inked and then the detail added on with a marker. For the owl I used Twinkling H2O's and white gel pen for the centre of his eyes.

Memory Maze products:
Love - G0044
Owl on a Branch - S0046

Other products:
Teresa Collins papers, Kraft cardstock, D-lish Scraps twine and beads, staples.

Thanks so much for stopping by, I hope you like what I have created to share with you all.

Until next time
Star xx